Website Backgrounds

Sunday, May 30, 2010

Another variable: time

I did a test run of my experiment and took these pictures (the stepladder in the bath was my Dad's idea).


This is the stepladder in the bath, without any sticks/weights on it yet.


These are the crosses (they have two rungs so it doesn't rotate), drying. The paper is marked with the approproate distance apart for the rungs, and the time they were made.
This is the setup with the bag (below) and matchsticks.
I was checking the setup worked properly. This afternoon I'll do the first actual experiment (with the times measured out).

Wednesday, May 12, 2010

Experiment Design Model

I haven't bought the stuff for my experiment yet, so I decided to make a quick cardboard model to illustrate the design.


The surfaces are marked A and B (the A is covered; it's the orange one underneath). The plastic bag is hanging. This model is not to scale.
In other news... I finally got a background image to work on my blog!

Tuesday, May 11, 2010

Method

Materials (amount required for one repetition of experiment)
• 8 plywood planks
• 8 plastic planks
• Heat glue
• Plastic (solvent) glue
• PVA wood craft glue
• Glue stick (designed for use on paper)
• 8 plastic garbage bags
• 250mL measuring cup
• Water

Method
1. Make four wood crosses and four plastic crosses, as in figure 1, each joined at the centre with a 5mmx5mm area of the glue to be tested. Write on each cross which glue was used to make it.


Click here for larger version of figure 1.

2. Leave the crosses to dry for 48 hours without stressing the joins.
3. Set up equipment as per figure 2, with one cross.


Click here for larger version of figure 2.

4. Hang a plastic garbage bag, with one handle over each point marked in figure 2.
5. Pour 100mL of water into the plastic garbage bag.
6. Continue pouring water into the bag in 100mL increments until the glue bond breaks completely at the centre of the cross.
7. Record the amount of weight supported by the glue bond before breaking.
8. Repeat steps 1-7 for all glue and wood types.
9. Repeat steps 1-8 on at least two separate occasions.

Information about Method

I got approval for the glue experiment, so that's what I'm doing now. The next post will be my method.

My Dad thinks that the glues, when put on the "right" surface, could hold kilograms. Which kind of makes my 10mL syringe obselete. I'm trying to figure out how to overcome this; probably by adding water in 100mL increments. Another way to change this will be to use less of each type of glue, over a smaller area, to reduce the amount of weight required to break the bond.

Another problem is how to attach the bag to the hook. Obviously this bond needs to be stronger than the glue! I think I may use a ceiling hook designed for about 7kg.

Sunday, May 9, 2010

Climatic Graph

This is my climatic graph. Unfortunately the pencil colours didn't scan very well.

Saturday, May 8, 2010

Changing the experiment

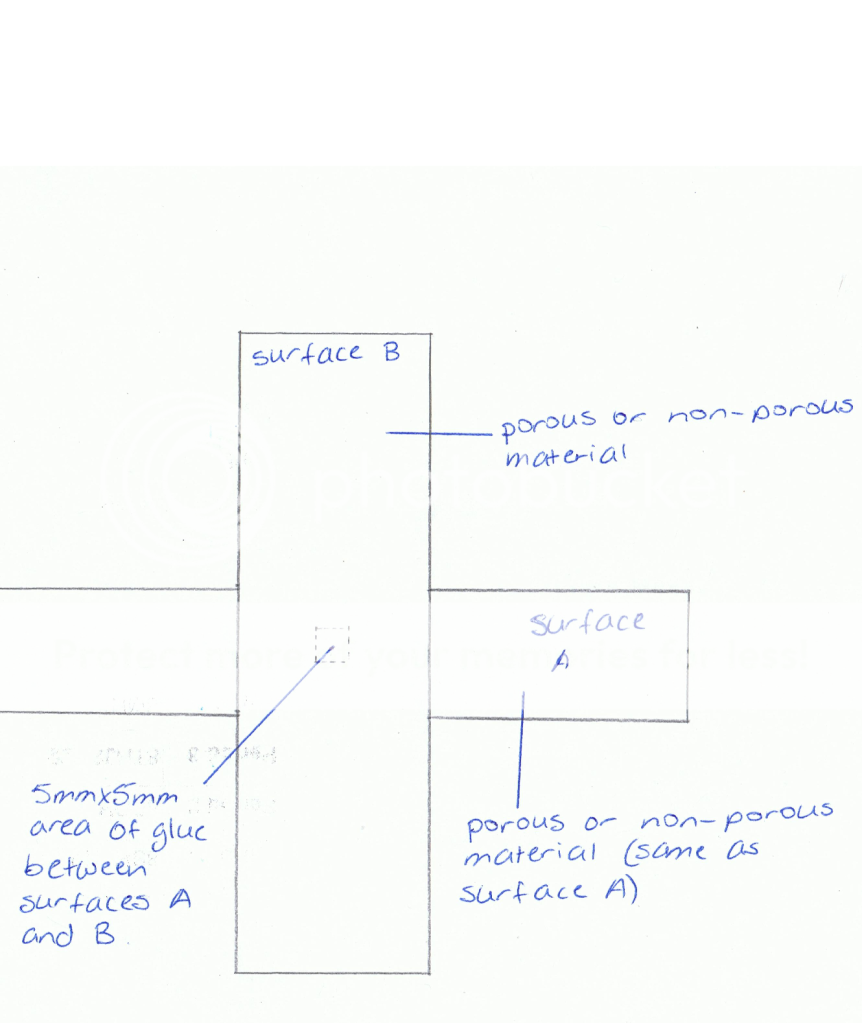
After some consideration, I have decided that the petrol consumption experiment involves too many variables that cannot be controlled adequately. I had an idea for a new experiment investigating the durability of different types of glue (wood, paper, waterproof, glue stick) in bonding different types of surfaces (porous and non porous). I will have to write up a formal method for this experiment.

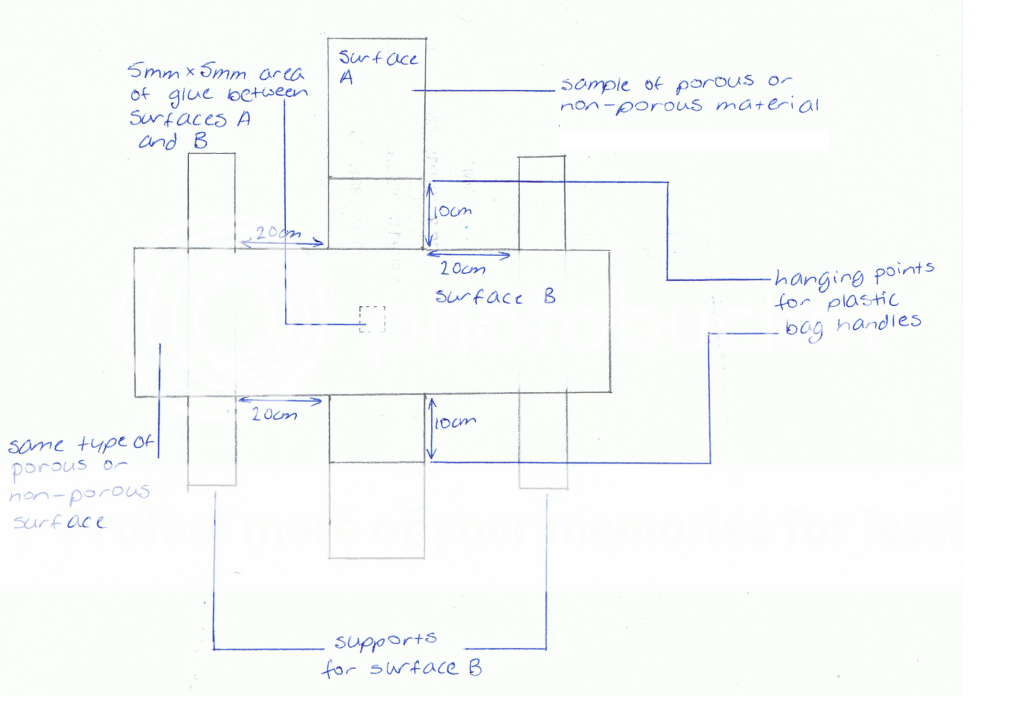
The basic plan is to bond two surfaces with glue, wait for the glue to dry, and then incrementally increase the weight on the bond until it breaks.

Dependent variable: type of surface (porous/non porous), type of glue

Independent variable: Amount of weight held before the bond breaks

Controlled variables:
-- Surface area of glue: 1cm2
-- Amount of glue: 0.5mL (Luckily I have loads of tiny measuring syringes from medicating sick guinea pigs)
-- Weight of container... probably some sort of plastic bag, maybe a Snap-Lock sandwich bag?
-- Weight placed into bag: Water in 5mL (5g) increments
-- Amount of time glue allowed to dry before being tested: Probably 24-48 hours; I'll check the "recommended drying" times on glues and use the longest one.
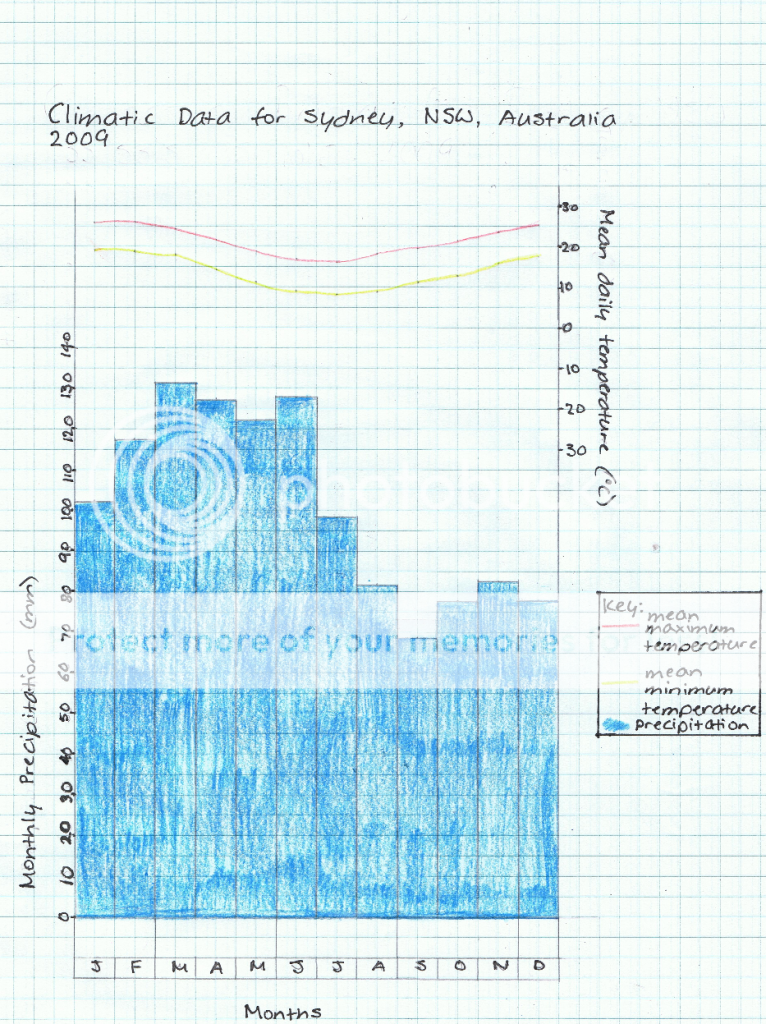
-- Weather conditions of testing: Humidity, temperature etc. This probably won't be a problem as they'll all be in the same area, on the same day. The experiment will also be repeated several times on different days.

I think this experiment will be possible to carry out and control.

Sunday, May 2, 2010

Back from holidays and starting experiment

I've finally returned from holidays so I can start posting on my blog again and doing my experiment. Un(?)fortunately I haven't been on any long drives yet, but this should (un)fortunately change. Also, I found out that when I turn 16, I'll be able to start learning to drive, so if I wanted I could be extra hands on with this experiment! Maybe that would be a little too dangerous...

Thanks to Izzy for pointing out some more variables I need to control -- whether the car airconditioning and stereo are on or off, which could burn extra petrol. Since it's winter, I'll get us to turn them off all the time that's being recorded, just to make it simpler.